Hi Readers ! Today i am going to show you the Filesystem Configuration Of ubuntu . Last time i show you how to Boot Process and Rescue Mode Of ubuntu. So let we start.
MAKE THE FILESYSTEM WORK FOR YOU


Using parted to Create a Swap Partition


$
sudo mount -a
In this section, I create a RAID 1 array for my
wife’s home directory to make sure her data
is protected. The applicable partitions are /dev/sdb1 and /dev/sdc1. I also
install the mdadm package, which installs
applicable commands and modules.
$
sudo vgextend volgroup1 /dev/sdb1

$
sudo lvextend -L 1000M
/dev/volgroup1/logvol1


$
sudo mkfs.ext3 /dev/volgroup1/logvol1
$
sudo ln -s /dev/volgroup1/logvol1 /dev/disk/by-uuid/`cat uuidlv1`
This Tutorial focuses on filesystems and how they can be configured on formatted partitions, software RAID (Redundant Array of Independent Disks) arrays, and logical volumes. Linux directories follow a protocol known as the Filesystem Hierarchy Standard (FHS). Several tools are available to create and format partitions and more.
While it’s easier to configure logical volumes and RAID arrays during the standard installation process, that’s not always possible. This chapter describes how you can configure partitions and then create RAID arrays and logical volumes after the Ubuntu Server operating system is installed.
MAKE THE FILESYSTEM WORK FOR YOU
Everything
in Linux is associated with a file. Partitions are represented by filesystem device
files, such as /dev/sda1. Logical volumes and RAID arrays are also represented by filesystem device files. Other components such
as CD/DVD drives are associated device
files, such as /dev/dvd. The standard for organizing files and directories in
Unix and Linux is through the Filesystem Hierarchy Standard (FHS). This section
provides a basic overview of the FHS.
The Filesystem Hierarchy Standard
While
there are variations, modern Unix/Linux operating systems share several common
directories. Some of these directories are dedicated for user files, drivers, kernels, logs,
programs, utilities, and more. These directory categories, documented in the FHS, make
it easier for users of other Unix-based operating systems to understand the basics of
Linux.
directories. Some of these directories are dedicated for user files, drivers, kernels, logs,
programs, utilities, and more. These directory categories, documented in the FHS, make
it easier for users of other Unix-based operating systems to understand the basics of
Linux.
On every Linux distribution, the filesystem starts with
the top-level root directory, also known
by its symbol, the single forward slash (/). Every other Linux directory is a
subdirectory of that top-level root directory.
Major directories are summarized in Table 5-1. Unless subdirectories are
mounted separately, you can also find their files on the same partition, RAID array, or logical volume as the root
directory. You might not see some of the directories shown in the table if you
have not installed associated packages, as not all directories shown are officially part of the FHS.
Mounted directories are often known as volumes
and can span multiple partitions in RAID
arrays or logical volumes.
NOTE In Linux, there are several different
meanings associated with filesystem. A filesystem can refer to the FHS, an individual partition such as
/dev/hda1, or a format such as ext3 or vfat.
1.Must Read :How to Installing Ubuntu Server?
2.Must Read :Automated Installations with Kickstart
Partition Device Files
Before
you review how to create partitions, take a step back and examine how partition
device files work. Partitions can be created on several different types of
media:
▼ PATA drives Since nearly
the beginning of the PC era, the standard computer
system has been configured to manage up to four IDE (Integrated Drive
Electronics) hard drives, now known as PATA (Parallel Advanced Technology
Attachment) drives.
system has been configured to manage up to four IDE (Integrated Drive
Electronics) hard drives, now known as PATA (Parallel Advanced Technology
Attachment) drives.
■ SATA drives Current PCs can
also handle SATA (Serial ATA) drives.
■ SCSI drives Servers commonly are configured with SCSI
(Small Computer
Systems Interface) drives. Depending on the SCSI hardware, up to 31 different
SCSI hard drives may be attached.
Systems Interface) drives. Depending on the SCSI hardware, up to 31 different
SCSI hard drives may be attached.
■ USB drives It’s not currently possible to boot Linux
directly from a USB
(Universal
Serial Bus)-based hard drive or similar device such as a USB key, since you can’t load Linux boot files directly from these
drives. However, it is possible to set up a boot floppy or CD/DVD
to start Linux from these drives. Directories
other than /boot can be mounted on a USB drive.
▲ IEEE 1394 drives IEEE 1394 (Institute of Electrical and
Electronics Engineers
standard 1394, also known as FireWire or iLink) hard drives have similar
abilities and limits to USB drives.
There are limits to how directories can be configured. While you can use
as many PATA, SATA, SCSI, USB, and IEEE 1394
drives as your hardware can handle, the Linux boot files from the /boot directory must be installed on one of the
first two internal hard
drives; alternatively, you’d need to configure a
boot floppy, CD, or USB key, depending on the capabilities of the BIOS. standard 1394, also known as FireWire or iLink) hard drives have similar
abilities and limits to USB drives.
On each drive, up to four primary partitions can be
configured. One primary partition can
be assigned as an extended partition, which can be subdivided into logical
partitions. While more can be configured using tools such
as fdisk,
Linux recognizes no more than 16
partitions on a SATA/SCSI drive.
Ubuntu systems normally detect all partition devices
listed in this section automatically. In
the context of the Linux FHS, partition devices, are part of the /dev
directory. Typical partition device files are described in Table 5-2.
Create Partitions with fdisk
Older Linux veterans know
the fdisk utility. It’s the
traditional partition management tool for
Linux. This section describes a few of the basic fdisk commands. The expert mode
available for fdisk
illustrates the flexibility of this tool, which is much more capable than the Microsoft version, FDISK.EXE.
NOTE This section
assumes you’re working on Ubuntu Server Edition with at least two SCSI hard
drives. If you don’t have such hardware available, SATA drives are also
acceptable. Alternatively, a VMware Server-based virtual machine
makes it easy to create virtual SCSI drives. That’s what I used when
writing this book.
The Basics of fdisk
First,
you need to know the device file of the drive to be configured. The easiest way
to determine this is with the following command, which lists all
connected drives—if they’re detected:
$ sudo fdisk
-l
You’ll see drive sizes, listed in order, as well as
partitions configured on each drive. A sample output is shown in Figure 5-1.
Note the partitions configured on the first two drives.
The actual drive order varies by hardware; portable drives such as those connected by USB and IEEE1394 devices appear after internal
devices.
The following code shows how fdisk is
used to open the second SCSI or SATA drive, /dev/sdb,
to access an fdisk-based
command line prompt. From this prompt, the m
command lists basic fdisk commands.
$ sudo
fdisk /dev/sdb
Command
(m for help): m
Command action
a toggle a bootable flag
b edit bsd disklabel
c toggle the dos compatibility flag
d delete a partition
l list known partition types m print this menu
n add a new partition
o
create a new empty DOS partition
table p print the partition table
q quit without saving changes
s create a new empty Sun disklabel
t change a partition's system id
u change display/entry units
v verify the partition table
w write table to disk and exit
x extra functionality (experts only)
t change a partition's system id
u change display/entry units
v verify the partition table
w write table to disk and exit
x extra functionality (experts only)
Command
(m for help): q
There’s a lot that you can do with the fdisk utility. If you’re interested in fdisk in depth,
run the x command to review associated extra functionality.
Important fdisk Commands
To
see what fdisk
can do, type in the print command (p). Examine how it prints out the current
partition table. The capacity of the drive and each configured partition is
listed in cylinders. In the following case,
the drive contains 130 cylinders, and 65 cylinders are used by the only
configured partition on this drive.
Command
(m for help): p
Disk
/dev/sdb: 1073 MB, 1073741824 bytes
255 heads,
63 sectors/track, 130 cylinders
Units = cylinders of 16065
* 512 =
8225280 bytes Disk identifier:
0x5ab062c8
Device Boot Start End Blocks Id
System
/dev/sdb1 1 65 522081 83
Linux
Command
(m for help):
From the available free space, you can create a new (n) partition which can be either a
primary (p) or logical (l) partition. If an extended partition doesn’t already exist, you can
create it with the e command; that extended partition can then contain logical partitions.
primary (p) or logical (l) partition. If an extended partition doesn’t already exist, you can
create it with the e command; that extended partition can then contain logical partitions.
When you assign space to a partition, you’re assigning a block of
cylinders on that
hard disk. If you have free space, the fdisk default starts the new partition at the first
available cylinder. The actual size of the
partition depends on disk geometry, which
can lead to a variance of several megabytes. In other words, if you
specify a partition
of 100MB, the actual size of the partition might be something like 96MB or
104MB.
Use fdisk to Delete a Partition
To
see how the fdisk
utility works, take a look at how it deletes a partition. For the purpose of this section, I’ve configured the target partition
without any data. To delete a partition
from my second SCSI drive, I take the following steps:
1. I run the sudo fdisk /dev/sdb
command. This opens the following fdisk
prompt:
prompt:
Command
(m for help):
2. I print the
current partition table with the p command, which lists any
configured
partitions by device. For example, the first partition on the second SCSI drive
is /dev/sdb1.
3. I delete the
partition with the d
command. If this is the only partition on the
drive,
it is automatically deleted. If there is more than one partition configured
on this drive, I’m prompted for the partition number with a prompt like this:
on this drive, I’m prompted for the partition number with a prompt like this:
Partition number (1-4):
4.
Before changes are made, they have to be written to disk with the w command.
This deletes the partitions; at this point, data would be much more difficult
to recover. It takes a few seconds to write the changes before returning to the
command line.
This deletes the partitions; at this point, data would be much more difficult
to recover. It takes a few seconds to write the changes before returning to the
command line.
The partition table has been altered!
Calling ioctl() to re-read partition table.
Syncing disks.
It’s
no longer necessary to use the sync or partprobe
command or reboot to implement the changes. I now have an empty hard disk or
hard disk area in which to create needed
partitions.
Use fdisk to Create a Regular Partition
This
section illustrates how to create a new partition for the /boot directory. Any
existing partition associated with this directory can
then be used as a backup. In this example, I create a partition on the
second SCSI drive. In general, a partition created for the /boot directory should be on one of the first two
physical drives. To add a suitable partition to my second SCSI drive, I take the following steps:
1. I run the sudo fdisk /dev/sdb
command. This opens the following fdisk
prompt:
prompt:
Command
(m for help):
2. I print the
current partition table with the p command, which lists any
configured
partitions by device. For example, the first partition on the second SCSI drive
is /dev/sdb1.
3. I run the n command to create the new partition.
4. I
specify the p
command to set it as a primary partition. These steps assume the
second SCSI disk has primary partitions available.
5. When I see the following prompt, I specify a partition
number. If the number is
already taken, fdisk provides a message to that effect and allows me to try
again.
Partition number (1-4):
6. If
partitions are already configured on the second SCSI disk, I recommend that
this partition is configured to start at the first
available cylinder. Normally,
that’s the default, as suggested by the prompt shown here:
First cylinder (1-256, default 1): 1
7. One
of the strengths of fdisk is
its ability to specify partition sizes in a normal
format, such as bytes, kilobytes, or megabytes. To
specify a size of 100MB, I
follow the suggestions at the prompt shown here:
Last cylinder or +size or
+sizeM or +sizeK (2-256,def
256): +100M
8. As a partition associated with the /boot directory
should be bootable, I use the
a command.
9. I run the print command (p) one more time to make sure that I made the right
changes. Although I specify a 100MB partition, the
geometry of the disk generally
does not allow that precise size, as shown in the
example. The effect is variable.
On one disk, a 100MB partition actually covers 92MB. On
another disk, a 100MB
partition covers 99MB.
10. Assuming
I’m pleased with the changes, I use the write command (w) to record
the changes to the disk.
I can now format the partition. Then I can mount the
partition and copy desired files to the new partition. Finally, I implement the
changes in the /etc/fstab configuration file. This
process is covered a bit later.
Use fdisk to Create a Swap Partition
This
section assumes a swap partition is available, appropriately sized for the RAM
on the local system. This section illustrates how to create an additional swap partition
using fdisk. You already know how to open a disk for editing with fdisk. Here, I create a
swap partition on my second SCSI hard drive. For the purpose of this exercise, I assume
there’s at least 512MB of free space available. (For learning purposes, the swap partition
can be smaller.)
1. I run the sudo fdisk /dev/sdb
command to get to the following fdisk prompt:
Command
(m for help):
2. I
run the l
command to list available file types. While the fdisk default creates a
Linux Native type partition, many other types are available. Note the hex code
for a regular Linux partition (83) and a Linux swap partition (82).
Linux Native type partition, many other types are available. Note the hex code
for a regular Linux partition (83) and a Linux swap partition (82).
3. I run the n command to create a new primary or logical
partition. I create it and
specify with a size of 512MB.
specify with a size of 512MB.
4. I run the p command to review the new partition, and
note the number assigned
to the partition.
to the partition.
5. I run the t command, and type in 82 to change the file system type to a Linux
swap partition.
swap partition.
6. I confirm the
result by running the p
command again.
7. I run the w command to write the changes to disk.
At
this point, I can format the new partition, activate it as a swap device, and
then configure it in /etc/fstab. This process is discussed a bit later.
The parted Utility
One
primary alternative to fdisk is parted, an
excellent tool developed by the GNU Foun-
dation. As with fdisk, parted can be used to create, check, and destroy partitions, but it
can do more. It can also be used to resize and copy partitions, as well as the file systems
contained therein. More information is available at www.gnu.org/software/parted.
dation. As with fdisk, parted can be used to create, check, and destroy partitions, but it
can do more. It can also be used to resize and copy partitions, as well as the file systems
contained therein. More information is available at www.gnu.org/software/parted.
CAUTION Be extra careful with the parted utility. Changes made are immediately written to the target
partition or drive, even before parted is
closed.
This discussion assumes that you’ve run a command such
as sudo parted /dev/sda to open
a drive. When parted is
open, the following prompt appears:
(parted)
If you use parted and then check configured partitions with fdisk, you
might see errors such as this:
Partition
1 does not end on cylinder boundary.
Such
an error is not a big deal. While fdisk partitions are associated with hard drive cylinders, parted is not so limited.
The Basics of parted
Before
you use parted to work with a partition, you need to know the device
file of the drive to be configured. The easiest way to do
this is with the following command, which in this case lists the partitions
configured on the second SCSI or SATA drive:
$ sudo parted /dev/sdb print
You’ll
see the size of the noted drive, as well as partitions configured on that
drive. The following code shows how I start the parted utility to open that second SCSI or SATA drive, /dev/sdb, to access the (parted)
command line prompt:
$ sudo
parted /dev/sdb
GNU Parted
1.7.1
Using
/dev/sdb
Welcome to GNU Parted! Type 'help' to view a
list of commands. (parted)
As suggested by the comment, the help
command lists available commands. If you’re familiar with fdisk,
you can see that parted
can do more, as it can even format and resize partitions.
Unfortunately, the format functionality is limited and does not allow you to create or resize ext3 partitions, at least as of this
writing.
For more information on each of these commands, run help command. For example, the
help rm
command specifies how the rm command can be used to remove a partition. You
don’t have to follow the specified command format precisely; parted
commands prompt you for any required
information.
Important parted Commands
At
the (parted)
command line prompt, start with the print command to review the current partition table,
assuming one exists. If free space is available, you can use the mkpart
command to make a new partition. You could even use the mkpartfs
command to make and format a new partition. The mkfs
command can format partitions, but not to
the default ext3 filesystem. The rm command can delete partitions.
Remember that disks can have up to four primary
partitions, corresponding to num-
bers 1 through 4. One of the primary partitions can be redesignated as an extended parti-
tion. The remaining partitions are logical partitions, numbered 5 and above. While the parted utility allows you to create more than 15 partitions, in this case, anything beyond /dev/sdb15 is not recognized by Linux.
Deleting a Partition
It’s
easy to delete a partition: From the (parted)
prompt, use the rm
command to delete the partition that you no longer need. Of course, before deleting any
partition, you should do the following:
▼ Save any data
you need from that partition.
■ Unmount the partition.
■ Delete any entry in /etc/fstab, so Linux
doesn’t try to mount it the next time
you boot.
▲ Start parted
and run the print
command to identify the number of the partition
to be deleted.
For
example, if you want to delete partition /dev/sdb2 from the (parted)
prompt, run the following command:
(parted) rm
2
Using parted to Create a Regular Partition
Here I create new
partition for the /home/michael directory. Any existing partition associated with this directory can then be used as
a backup. I do this on the third SCSI or SATA drive.
Whenever a new hard drive is installed, a new partition
table is required. While the sudo parted /dev/sdc
command opens a freshly installed third SCSI or SATA drive, a new label is required. I try to review the
partition table with the print command and get the
following message:
Error:
Unable to open /dev/sdc - unrecognised disk label.
CAUTION Don’t run the mklabel command in the parted
utility on any disk with data that you want to keep. All existing
data on the disk will be deleted.
Before I can do anything else with this drive, I need to
create a label. I consult the list of
avaible commands, and note that I can do this with the mklabel
command. As strange as it sounds, the default label to be used
for a Linux hard drive is msdos, as shown with the following commands. You might
recognize that label from the installation process as described in Chapter 2.
(parted) mklabel
New disk label type? msdos
Now I can add a partition to my third SCSI or SATA drive
with the following steps:
1. If parted isn’t
already open, I run the sudo parted /dev/sdc command, which
opens the (parted) prompt:
opens the (parted) prompt:
(parted)
2. Now I create a
new partition with the mkpart
command. The parted
utility
prompts
for required information. If an extended partition already exists, I can create a logical partition.
(parted) mkpart
Partition type? primary/extended? primary File system type?
[ext2]? ext2
Start? 0
End? 100 MB
3. Now I review
the results, as follows:
(parted) print
Disk /dev/sdc:
1074MB
Sector size
(logical/physical): 512B/512B Partition
Table: msdos
Number Start End Size Type File
system Flags
1 0.51kB 100MB 100MB
primary ext2
NOTE If this is the
first partition you’ve created on this drive, the File system column is empty,
no
matter what you have entered. You can address that issue with the mkfs command. If you then exit
from parted, you can reboot or run the partprobe command to get Linux to read the new partition
table.
matter what you have entered. You can address that issue with the mkfs command. If you then exit
from parted, you can reboot or run the partprobe command to get Linux to read the new partition
table.
Now repeat the process to
create a swap partition. Make the start of the new partition 1 MB after the end of the preceding partition. Use
the same commands, substituting the linux-swap file
system type as appropriate:
(parted) mkpart
Partition type? primary/extended? primary File system type?
[ext2]? linux-swap
Start? 101MB
Start? 101MB
End? 1000MB
Here’s the result:
(parted) print
(parted) print
Disk /dev/sdb:
10.7GB
Sector size
(logical/physical): 512B/512B
Partition Table: msdos
Number Start End Size Type File
system Flags
1 0.51kB 100MB 100MB
primary ext2
2 101MB 1000MB 900MB
primary
Repeat the process to create a regular partition after
the swap partition:
(parted) mkpart
Partition type? primary/extended? primary File system type?
[ext2]? ext2
Start? 1101MB
End? 2100MB
Now
exit from parted. To get Linux to read the new partition table,
reboot or run the partprobe command. Then exit from parted with the quit command.
CAUTION Sometimes you’ll see errors when you run the partprobe command, even on a
correctly configured system. For example, if you haven’t put a disk into an
existing floppy drive, errors related to the device file (usually
fd0) can occur. If the disk in your CD/DVD drive is read-only you’ll see a message to that effect.
Format New Filesystems
It’s
not enough to create a new partition: it also has to be formatted. Linux
supports
a rich variety of filesystem formats, which can be somewhat inaccurately divided into
“standard” filesystems without a journal and “other” filesystems that do contain a jour-
nal. Generally, journaling filesystems are better suited for larger partitions. This section
reviews a list of basic standard and journaling filesystems and shows how they can be
formatted. It does not include filesystems such as those associated with MINIX or The
SCO Group. One more command is required to activate a swap filesystem.
Standard Filesystem Formats
Linux is a clone of Unix
that was developed from the Unix filesystems available at the
time. The first Linux operating systems used the Extended Filesystem (ext). This has
evolved into the standard Second Extended Filesystem (ext2), still in use for smaller par-
titions. For example, it’s common to create a 100MB partition for the /boot directory; that
partition is often formatted to ext2. A sample of standard filesystem formats is shown in
Table 5-3. These formats appear in lowercase characters, as the associated commands (and
the output to the mount command) generally also cite these formats in lowercase.
Journaling Filesystem Formats
As hard disks and
partitions grow in size, Linux users are moving toward filesystems with journaling features. Journaling filesystems
have two main advantages: they’re faster
for Linux to check during the boot process, and if a crash occurs a journaling
filesystem has a log (also known as a journal) that
can be used to restore the metadata for the files
on the relevant partition. The default filesystem for Ubuntu is ext3; several
options are shown in Table 5-4.
How to Format a Filesystem
There
are several commands available which can format a Linux filesystem. All are based on the mkfs
command, which includes extensions that
describe the filesystem format, such as mkfs.ext2, mkfs.ext3,
and mkfs.reiserfs.
Closely related is the mkswap command, which formats a
Linux swap partition. Of course, the commands discussed in this section should not be run on a mounted filesystem.
These commands are straightforward. The following command
formats the /dev/ sdb1 partition to the ext2 filesystem:
$
sudo mkfs.ext2 /dev/sdb1
The following command formats /dev/sdc2 to the Linux
swap filesystem:
$ sudo mkswap /dev/sdc2
You can convert partitions between the ext2 and ext3
formats. As the only difference is
the journal, you could add a journal to the ext2 formatted /dev/sdb1 partition
with the following command:
$ sudo tune2fs -j
/dev/sdb1
The journal can be removed with the following command:
$ sudo tune2fs -O
^has_journal /dev/sdb1
How to Set Up a Swap Partition
As suggested, swap
partitions are a bit different from regular partitions. First, they’re given swap filesystem types in utilities such as fdisk
and parted.
Next, they’re formatted with the mkswap command. To activate a swap partition such as
/dev/sdc2, you would need to run the following command:
$ sudo swapon /dev/sdc2
Manage Filesystems in /etc/fstab
While you can run the mount
command to activate and copy data to newly formatted partitions, that’s not enough. Such partitions aren’t recognized during
the boot process unless they’re
configured in the /etc/fstab configuration file. To understand what’s configured in this file, review it with a command like less /etc/fstab.
As you can see in Figure 5-2, different
filesystems are configured on each line.
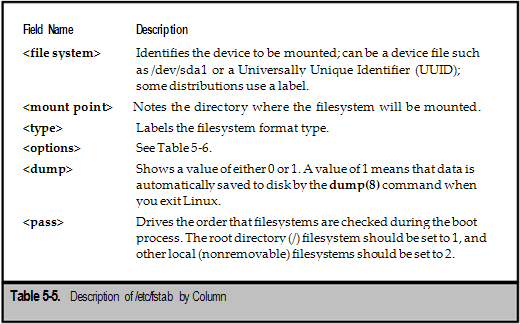
As suggested by the opening comments in the
file, there are six fields associated with each filesystem. Table 5-5 describes these fields,
from left to right.
More information is required for the <options> column. Generally, defaults is the appropriate mount option for most /etc/fstab filesystems. Some major options are listed in Table 5-6. Opposites such as sync and async, auto and noauto are often available. Multiple options can be separated by commas. A more complete list is available with the man mount command.
Finally, consider those pesky UUIDs. If you’ve configured
regular partitions on local drives, UUIDs aren’t
required. You can use the device file associated with the subject partition.
But because Ubuntu is now configuring /etc/fstab with UUIDs to accommodate partitions on hot-swappable drives, you need
to learn about them.
A UUID is configured for each standard partition in the
/etc/fstab configuration file. The default Ubuntu /etc/fstab file includes comments for the
associated partition device. For example,
based on the /etc/fstab in Figure 5-2, you can replace the UUID expression
associated with the /boot directory with /dev/sda1.
UUIDs are listed in the /dev/disk/by-uuid directory. Run
the ls -l /dev/disk/by-uuid command
and note the links from the UUIDs to device files. Compare these results to those of the blkid
command. As shown in Figure 5-3, the blkid results correlate partition device files, UUIDs, and format types. But be aware, the blkid
command is not updated when you generate a new UUID.
Similar
output is available from the sudo vol_id /dev/sda1
command. It identifies the filesystem, format, and UUID. Unlike the output to
the blkid command, the UUID in this
output is up to date.
If you’ve just created a new partition, such as the
100MB partition created earlier on the /dev/sdb2 device,
your next steps are to format it and generate the UUID with the following command:
$
uuidgen /dev/sdb2 > uuidsdb2
Then
apply the new UUID to the device with the following command. If you’re familiar
with the effect of back quotes (`), you understand that the output of cat uuidsdb2 is taken
as input to the tune2fs -U command, which is applied to the /dev/sdb2 partition.
with the effect of back quotes (`), you understand that the output of cat uuidsdb2 is taken
as input to the tune2fs -U command, which is applied to the /dev/sdb2 partition.
$ sudo tune2fs -U
`cat uuidsdb2` /dev/sdb2
This
might seem strange—a UUID is generated for a specific device, and then the UUID
has to be applied to that device. The uuidgen
command doesn’t automatically apply the UUID
to the device.
Review the format of the /etc/fstab configuration file.
You can write the UUID directly to this file. To apply the new UUID to the
mount directory, take the following steps.
First, this is one case where you’ll need direct root administrative access,
available with the following command:
$ sudo su
Next, add an appropriate line to the end of the /etc/fstab
configuration file. This command is a bit dangerous; back up the /etc/fstab configuration
file first:
# cp /etc/fstab
~
You can then add the appropriate line to /etc/fstab with
the following command:
# echo "UUID=`cat uuidsdb2` /mnt ext3 defaults 0
2" >> /etc/fstab
Run the exit command to leave the administrative interface. To confirm
that the changes were added to the end of the /etc/fstab file, run the
following:
$ less
/etc/fstab
Now, try to mount the new partition (and all other new
partitions) in /etc/fstab with the following command:
You’ll get an error message suggesting that some special
device in the /dev/disk/
by-uuid directory does not exist. Aha! That’s the UUID for the /dev/sdb2 partition
device. You now need to create the link and can do so with the following command:
by-uuid directory does not exist. Aha! That’s the UUID for the /dev/sdb2 partition
device. You now need to create the link and can do so with the following command:
$ sudo ln -s
/dev/sdb2 /dev/disk/by-uuid/`cat
uuidsdb2`
Now try the aforementioned sudo mount -a
command again; now that the UUID is properly
linked, you’ll get no messages. To confirm the change, run the mount
command by itself, and you’ll see that the /mnt directory is mounted on
the /dev/sdb2 partition. If desired, you
can further confirm success by rebooting your system.
To review, the following steps were used to set up a
UUID:
1. Run the uuidgen
command on a newly formatted partition.
2. Apply the new
UUID to the partition with the tune2fs -U command.
3. Configure /etc/fstab with the
new partition, mount point, and UUID.
HOW TO MAKE RAID WORK
A RAID array is a series of disks or partitions that can save your data even if a catastrophic failure occurs on one of the disks. While some versions of RAID make complete data copies, others use the so-called parity bit to allow your computer to rebuild the data on lost disks. Software RAID is configured on a meta device, which is a composite of two or more devices. Here you’ll learn about the different levels of software RAID available in Ubuntu, how to create a RAID partition, how to configure and activate a RAID array, and how to set up RAID in /etc/fstab.
NOTE Hardware RAID is beyond the scope of this
book.
RAID Definitions
Depending on how you look at it, each of the nine or ten different types of RAID arrays; all
but one are associated with a different level of data redundancy. It’s even possible to com-
bine different types of RAID arrays. As the focus here is on the Ubuntu server, the following
supported levels of software RAID are discussed: 0, 1, 5, and 6. In all cases, if RAID is to work
as intended, each partition on a RAID array should be on a different physical hard drive.
Although RAID 4 is also supported, it is an inferior option (in my opinion) and is therefore
not included here. RAID 10 is also supported as a combination of RAID 1 and RAID 0.
This discussion assumes that software RAID arrays are set up on two or more physical partitions, but they can also be configured on entire hard disks.
RAID 0
RAID 0 is designed to speed reads and writes; however,
it provides no data redundancy.
It requires at least two partitions, preferably on
different physical hard drives. If possible,
they should be connected to different hardware
controllers.
In a
RAID 0 array, reads and writes to the hard disks can occur simultaneously on
two or more hard disks. All hard disks in a RAID 0 array
are filled equally. But since
RAID 0 does not provide data redundancy, a failure of any
one of the partitions will
result in total data loss. RAID 0 is also known as striping without parity.
RAID 1
RAID 1 is designed to set up two copies of the same data
on two separate partitions. To
work
as designed, these partitions must be located on separate physical hard drives.
If
one partition is damaged or deleted, all of the data is
stored on the other partition.
RAID 1 is slower than RAID 0 because data has to be
written twice. It is also relatively
expensive. To support RAID 1, you need a second hard disk
for every hard disk’s worth
of data. RAID 1 is also known as disk mirroring.
RAID 5
A RAID
5 array requires three or more partitions. Each partition should be located on
a separate physical hard drive. RAID 5 protects data by
creating stripes,
which is parity
information
distributed evenly across each partition. If one partition fails, the data can
be
reconstructed from the parity data on the remaining disks. RAID 5 is also known
as
disk striping with parity.
RAID 6
RAID 6
literally goes one better than RAID 5. In other words, while it requires four
or
more disks, it has two levels of parity and can survive
the failure of two member disks in
the array. RAID 6 is also known as disk striping with dual parity.
Create RAID
Partitions
Earlier
in this chapter, you learned how to create partitions with the fdisk and parted
utilities. In this section, you’ll learn how to set
configured partitions as RAID partitions.
In fdisk,
after you create a partition of the desired size, take the following steps:
1. Run the t command
from the fdisk
prompt.
2. If more than
one partition is configured on the current drive, you’re prompted
for a partition number.
3. At the prompt
that follows, type l to
list available codes.
4. As you should
see from the list that appears, the applicable code for a Linux
RAID partition is fd; type it in.
5. Run the p command to confirm the changes.
6. Run
the w command to write the changes to the disk and exit fdisk.
In parted,
after you create a partition of the desired size, it’s easy to set it up as a RAID partition. The steps are simple:
1. Run the
following command from the (parted) prompt:
(parted) set 1 raid on
(parted) set 1 raid on
2. Confirm the
result with the print
command.
3. Exit from
parted with the quit command.
Format and
Configure a RAID Array
As
data is stored in each component of a RAID array, each partition must be
formatted.
The method is the same as that for formatting a partition for direct use. For example, to
format the target partitions to the ext3 filesystem, I run the following commands:
The method is the same as that for formatting a partition for direct use. For example, to
format the target partitions to the ext3 filesystem, I run the following commands:
$ sudo mkfs.ext3 /dev/sdb1
$ sudo mkfs.ext3 /dev/sdc1
For this example, I’ve set up a spare partition on a
fourth SCSI drive, /dev/sdd1, which
I’ve also formatted. I can configure a RAID array in Ubuntu with the mdadm command. I configure the
two partitions appropriate for a RAID 1 array, along with a spare, with the
following command:
$ sudo mdadm
--create --verbose /dev/md0
--level=1
--raid-devices=2 --spare-devices=1 /dev/sdb1
/dev/sdc1 /dev/sdd1
First, unlike other commands, this command doesn’t work
with a backslash. I’ve artificially typed it in on two lines for
formatting purposes. It’s okay if the length of the command forces it to wrap to the next line.
The --create /dev/md0 option sets up the array on device /dev/md0 and assumes
this device file isn’t already in use. The --verbose option displays more information about the process. The --level=1 option sets up a RAID 1 array. The --raid-devices=2 option
configures two devices in the array. The --spare-devices=1 option configures one device
as a spare. That’s three devices, for which I designate three partitions,
/dev/sdb1, /dev/sdc1, and /dev/sdd1.
The
command leads to a group of messages associated with each device; here is an excerpt of my output:
mdadm: /dev/sdd1 appears to contain an ext2fs file
system
size=506016K mtime=Wed Dec 31 16:00:00 1969
mdadm: /dev/sdd1 appears to be part of a raid array:
level=raid1 devices=2 ctime=Wed Mar 12 10:10:22 2008
mdadm: size set to 505920K
size=506016K mtime=Wed Dec 31 16:00:00 1969
mdadm: /dev/sdd1 appears to be part of a raid array:
level=raid1 devices=2 ctime=Wed Mar 12 10:10:22 2008
mdadm: size set to 505920K
Continue creating array?
This output is to be expected; it means that
/dev/sdd1 is formatted. Even though
it refers to ext2fs, it’s actually formatted to the ext3 filesystem. The
message is the same
because ext3 is the same format as ext2, except ext3
includes a journal. The message
about being a part of a raid array is
just a sign that the partition has been configured as a
RAID partition using a tool such as fdisk or parted.
The size of the array, per the size set
to message, is based on the space available in
each component of the array. The last line
requests confirmation; the y
command is a sufficient response to that
prompt.
After
creating the array, I need to wait from a few seconds to a few minutes before
using the array, as it gets built. To monitor the build
process, I run the cat /proc/mdstat
command. If the array is still being built, I see a
message similar to the following in the
output:
[======>..... ..] resync=50.1%
Once the build process is complete, the /proc/mdstat file
contains the following
information, which identifies the array device as md0, an
active RAID 1 array, using
partitions sdd1, sdc1, and sdb1. The (S) identifies sdd1 as a spare.
md0 :
active raid1 sdd1[2](S) sdc1[1] sdb1[0]
505920 blocks [2/2]
[UU]
I can then review this information (and more) in a
human-readable format with the
following command:
$ sudo mdadm
--detail /dev/md0
If you
use this command, don’t pay attention to the UUID in the output to this file.
A new UUID will be generated and used for the /etc/fstab
configuration file in the next
section.
To make sure the array also has a journal, the associated device file also
needs
to be formatted:
$ sudo mkfs.ext3 /dev/md0
Use an Active RAID Array
Now
that the RAID array is active, it can be used. As noted earlier, I’m setting up
this
array
for my wife’s home directory, /home/donna. First, I back up the contents of her
directory, temporarily, to the /mnt directory:
$ sudo cp -ar
/home/donna /mnt/
Next, I mount the RAID array:
$ sudo mount
/dev/md0 /home/donna
Then I
can restore the files from Donna’s home directory to its new location on the
RAID array. Note the dot (.) at the end of the
/mnt/donna/, which copies all files, including
hidden files:
$ sudo cp
-ar /mnt/donna/. /home/donna
Maintaining RAID Arrays
RAID
arrays sometimes need maintenance. Hard drives do fail on occasion. Even if you’ve configured a spare partition, the failed drive
should be replaced. In other words, you need to know how to remove and delete a
partition from an array and how to add a new
partition to an array.
The
following command simulates a failure in the /dev/sdc1 partition of the /dev/ md0 RAID array:
$ sudo mdadm --verbose
/dev/md0 -f /dev/sdc1 mdadm: set /dev/sdc1 faulty in /dev/md0
Because
I had configured this earlier as a regular RAID device, the array has to be rebuilt; I can observe the progress if I run the cat /proc/mdstat
command right after simulating a failure in the /dev/sdc1 partition.
But
the /dev/sdc1 partition is still a part of the RAID array. To remove it, I run
the following command:
$ sudo mdadm --verbose
/dev/md0 -r /dev/sdc1
After
I replace the drive associated with /dev/sdc, an appropriate replacement partition can be created. At that point, the /dev/sdc1
partition can be added to the array with
the following command:
$ sudo mdadm
--verbose /dev/md0 --add
/dev/sdc1
Make RAID Work in /etc/fstab
It’s
not enough to create, configure, and maintain a RAID array. I need to make sure
the array gets properly mounted on Donna’s
home directory the next time this server is booted. I need to set up the array
in the /etc/fstab configuration file.
UUIDs aren’t required. I could use the device file
associated with the RAID array—in this case, /dev/md0.
However, if I choose to use the UUID, I could set up a new UUID number for this purpose. The following command
saves the UUID generated by the uuidgen command to the uuidmd0 text file:
$ uuidgen
/dev/md0 > uuidmd0
I then apply the new UUID to the RAID array device:
$ sudo tune2fs -U
`cat uuidmd0` /dev/md0
Now I need to add the RAID array and Donna’s home
directory to the /etc/fstab
configuration file. As it requires root administrative access, I first run this command:
configuration file. As it requires root administrative access, I first run this command:
$ sudo su
I can then add an appropriate line to the end of the
/etc/fstab configuration file. This
command
is a bit dangerous, so I back up the /etc/fstab configuration file first:
# cp /etc/fstab
~
I can
then add the appropriate line to /etc/fstab with the following command:
# echo "UUID=`cat uuidmd0` /home/donna ext3 defaults 0
2" >> /etc/fstab
While the exit command is not required, I use it to return to the
regular prompt.
I then create a link from the /dev/disk/by-uuid
directory with the following command:
$ sudo ln
-s /dev/md0 /dev/disk/by-uuid/`cat uuidmd0`
Now I can try the changes with the sudo mount -a command.
If it works, I’ll see
Donna’s home directory mounted on the RAID device in the
output to the mount
command. This should also work the next time this system is booted or
rebooted.
LOGICAL VOLUMES PROMOTE FLEXIBILITY
The concept of logical volumes makes it easier to increase or reduce the
size of a filesystem
after Linux is installed. For example, since extra space
is available on the /var directory
volume, and more space is needed for /home directories,
you can use the logical volume
tools to help you reassign the space. Alternatively, you
can add a new physical disk and
allocate
its storage capacity using logical volume tools to an existing /home directory
partition.
Logical Volume Concepts
In a
logical volume, physical hard disk partitions are set up in a bunch of
equal-sized
chunks known as physical extents (PEs). These PEs from one or more partitions are
mapped
to logical extents (LEs),
which are then organized into logical volumes (LVs).
Volume groups
can then be created from the space available in a LV.
But that’s a mouthful, especially if
you’re not familiar with logical volume concepts, so here
are some definitions:
▼ Physical volume (PV) A standard primary or logical partition
configured to a
logical volume format type.
■ Physical extent
(PE) A
chunk of disk space; every PV is divided into a number
of equal sized PEs.
■ Volume group
(VG) A
group of PVs; configures the pool of space for logical
volumes.
■ Logical extent
(LE) A
chunk of disk space; every LE is mapped to a specific PE.
▲ Logical volume (LV) A group of LEs; you can mount a filesystem
such as
/home
and /var on a LV.
While
it’s easiest to create logical volumes during the Ubuntu installation process,
it’s not always possible. To set up a logical volume, you need to create a new PV using
a command such as pvcreate, assign the space to a VG with a command such as vgcreate,
and allocate the space from some part of available VGs to a LV with a command such as
lvcreate.
it’s not always possible. To set up a logical volume, you need to create a new PV using
a command such as pvcreate, assign the space to a VG with a command such as vgcreate,
and allocate the space from some part of available VGs to a LV with a command such as
lvcreate.
To add space to an existing LV, you need to add free
space from an existing VG with a
command such as lvextend.
If you have no existing VG space, you’ll need to add to it with unassigned PV
space with a command such as vgextend. If all your PVs are taken, you might need to create a
new PV from an unassigned partition or hard drive with the pvcreate command.
But that might sound like a lot of gobbledygook to those
unfamiliar with logical volumes,
so the following sections break down the process. Just be sure to install the
lvm2 package for access to required commands,
like so:
$ sudo apt-get install lvm2
A substantial number of
files reside in the lvm2 package. The dmsetup package is also installed as a dependency, which also configures
the device mapper for creating logical volumes
from volume groups.
As an overview, logical volume configuration files are
stored in the /etc/lvm directory.
For PV-related commands, run the ls
/sbin/pv* command. For VG-related commands, run the ls /sbin/vg*
command. For LV-related commands, run the ls
/sbin/lv* command. These
files are described in more detail in the following sections.
Before you continue, run the following command to add the
appropriate module:
$ sudo modprobe dm-mod
Otherwise, you’ll have problems when creating a logical
volume. A couple of other
modules are required for certain actions related to copies and snapshots of logical vol-
umes:
modules are required for certain actions related to copies and snapshots of logical vol-
umes:
$ sudo modprobe dm-mirror
$ sudo modprobe dm-snapshot
Create Physical Volumes
The first step to create
a logical volume is to identify the available space on a physical disk. If you have just added an empty hard disk,
you can create a PV on the entire disk. For example, if you’ve just added a fourth SATA hard disk (/dev/sdd),
you could set up a PV on that disk with the following command:
$ sudo pvcreate /dev/sdd
You can also configure a new PV on a properly
configured partition, using the fdisk
and parted
utilities discussed earlier in this chapter. If you’ve added a new partition
called /dev/sdd1, for example, you’d follow this sequence
of commands (in bold) to
change the file type to Linux LVM:
$ sudo
fdisk /dev/sdd
Command (m for help)
: t
Partition number (1-4): 1
Hex code
(type L to list codes): 8e
Command (m for help)
: w
Next, confirm the results with the sudo fdisk -l /dev/sdd
command; the output
should be similar to the following:
Device
Boot Start End Blocks Id
System
/dev/sdd1 1 100 803218+ 8e Linux LVM
Alternatively,
if you’ve created a partition with the parted utility,
the following se-
quence of commands changes the file type with the same
result:
$ sudo
parted /dev/sdd
GNU Parted
1.7.1
Using
/dev/sdd
Welcome to GNU Parted! Type 'help' to view a
list of commands.
(parted) set 1 lvm on
(parted) quit
After the partition is ready, you can run the following
command to create a new PV
on that partition (/dev/sdd1):
$ sudo pvcreate /dev/sdd1
To take full advantage of logical volumes, you should
create such partitions and PVs
on all available free space. There are a number of other
PV-related commands available
in the
/sbin directory, summarized in Table 5-7. Because these commands require ad-
ministrative privileges, they should generally
be preceded with the sudo command
Creating a Volume Group
You can create a VG from two or more PVs using a
straightforward command: just sub-
stitute the name of your choice for volgroup1:
$ sudo vgcreate volgroup1 /dev/sdc1
/dev/sdd1
Once a VG is available, it’s easy to add more room. In
this example, I’ve created a PV
on /dev/sdb1 for this purpose and want to add more room
to the VG named volgroup1.
To
that end, I created a /dev/sdb1 partition, configured with the Linux LVM
partition
type, and applied the pvcreate command to that partition. I then add that partition to
the
existing VG volgroup1 as follows:
To
take full advantage of logical volumes, you need to understand the commands used to configure a VG and are available in the
/sbin directory; these are summarized in Table 5-8. As these commands require administrative privileges, they
should generally be preceded with
the sudo
command.
Creating a
Logical Volume
You
can create a LV from the space configured for a VG using the lvcreate command.
It’s a straightforward command. The following
command creates an LV on device /dev/ volgroup1/logvol1:
just substitute the name of your choice for volgroup1.
$ sudo lvcreate -L
200M volgroup1 -n logvol1
There are many variations on the lvcreate
command; however, this usage is the most straightforward,
as it specifies the size and name of the LV to be created. If you’re in doubt about the space available in the VG, run the vgs command.
LVs
are popular because they’re easy to expand. If the vgs
command confirms that
space is available in the VG, more space can be allocated with the lvextend command.
For example, the following command expands the size of the LV just created to 1GB:
space is available in the VG, more space can be allocated with the lvextend command.
For example, the following command expands the size of the LV just created to 1GB:
There
are a number of other LV-related commands available in the /sbin directory,
summarized in Table 5-9. As these commands require administrative privileges,
these commands should generally be preceded
with the sudo
command.
In addition, there are also a series of /sbin/lvm*
commands, most of which are not yet active
for the current Linux logical volume packages.
Activate
Logical Volumes
After
you’ve created an LV, a couple more steps are required—the volume must be formatted and mounted. These steps are similar to those
associated with a new partition and a RAID array, as described earlier in this
chapter. For the LV created in this section, /dev/volgroup1/logvol1, I’ve
set up 1000MB of space for that volume. Now I’ll set up the LV for the /home/book directory.
To format the new LV to the default ext3 filesystem, I
run the following command:
Now I create the /home/book directory if it doesn’t
already exist. To do so, I run the
following command to mount the new LV on that directory:
$ sudo mount
/dev/volgroup1/logvol1 /home/book
NOTE Remember that before expanding (or reducing
the size of) an LV, you should make sure the
data is
backed up on the volume; then unmount it, and then expand (or reduce) the size
of the LV.
You
can then remount the LV.
Configure
Logical Volumes in /etc/fstab
As with any new partition and RAID array, it’s important
to document the mount direc-
tory associated with the new LV in the /etc/fstab
configuration file. I need to make sure
the
array gets properly mounted on the /home/book directory the next time this
server
is
booted. To do so, I need to set up the array in the /etc/fstab configuration
file.
I don’t need to use UUIDs. I could just cite the device
file associated with the LV—in
this case, /dev/volgroup1/logvol1. If I choose to use
UUIDs, I need to generate one using
the uuidgen command.
Despite the LV UUID shown in the output to the lvdisplay
command, I need to set up a dedicated UUID for this
purpose, which I save to a text file
with the following command:
$ uuidgen
/dev/volgroup1/logvol1 >
uuidlv1
I then apply the new UUID to the LV device:
$ sudo tune2fs -U
`cat uuidlv1`
/dev/volgroup1/logvol1
Now I
need to add the LV and the /home/book directory to the /etc/fstab configu-
ration file. As command line-based appending requires
root administrative access, I first
run this:
$ sudo su
I can then add an appropriate line to the end of the
/etc/fstab configuration file. This
command
is a bit dangerous, so I first back up the /etc/fstab configuration file:
# cp /etc/fstab
~
I can
then add the appropriate line to /etc/fstab with the following command:
# echo "UUID=`cat uuidlv1` /home/book ext3 defaults 0
2" >> /etc/fstab
While the
exit command is not required, I run that command
to leave the administra-
tive
prompt. I still need to create a link from the /dev/disk/by-uuid directory,
which is
easy to do with the following command:
Now I can try the changes with the sudo mount -a
command. If it works, I’ll see the /home/book directory mounted on the LV
device in the output to the mount command. It’s
actually mounted on a LV mapper; the device should be configured on a /dev/ mapper/volgroup1-logvol1
device. The mounts in /etc/fstab should also now work the next time the system is booted.
SUMMARY
This Tutorial described
how you can manage filesystems after the operating system is installed. While
it’s easy to create partitions, RAID arrays, and logical volumes during the
installation process, administrators need to know how to perform these tasks
from the Ubuntu system command prompt. Each
major part of the chapter included a description of how to make the UUID work for you.
To
understand how filesystems can be configured, this chapter explained the FHS
and how partitions can be created from a variety of drives. The fdisk and parted utilities
are discussed in some detail. New partitions can be formatted to standard or journaling
filesystems, and then set up for a directory in the /etc/fstab configuration file.
and how partitions can be created from a variety of drives. The fdisk and parted utilities
are discussed in some detail. New partitions can be formatted to standard or journaling
filesystems, and then set up for a directory in the /etc/fstab configuration file.
To
understand how RAID arrays can be configured, this chapter explained the different levels of RAID, how RAID partitions can be
created using fdisk
and parted,
how RAID arrays can be created and managed with
the mdadm
command, when RAID arrays should be formatted, and how they can
be assigned to a directory in the /etc/fstab configuration
file.
To
understand how logical volumes can be configured, this chapter explained the workings of PVs, PEs, VGs, LEs, and LVs. It
continued with a description on how logical volume partitions can be created using fdisk and parted.
Such partitions can then be configured
as PVs, which can then be collected together in VGs. On any system, a VG can be flexibly divided into LVs, which can then be formatted
and assigned to a directory in the
/etc/fstab configuration file.
From Editor:
I hope you like this tutorial if you have any question then drop a comment and i reply asap.Thank you and Happy Blogging cheer:)
This is dummy text. It is not meant to be read. Accordingly, it is difficult to figure out when to end it. But then, this is dummy text. It is not meant to be read. Period.
ConversionConversion EmoticonEmoticon